okay, the one i wanna tell you is tips and tricks about DOF(Depth of Field) in mental ray, just in case, 3D software im used is 3ds max and i dont know this tricks will work in maya mental ray...cuz i never tried maya, maybe maya user out there can tell me if this is work :D
well lets get started
i suppose you guys already know that DOF can only be rendered with perspective or camera view, you can find the setting in camera parameters in multi-pass effect tab and for the perpective view in the render setting renderer tab.
okay, first create new material with black diffuse and name it Depthshader, turn on self illumination and give it fall-off material in the box beside the self illumitation color(1)
go to render setup in the processing tab, check enable in the material override, click the occlusion tab to open material browser, choose from Mtl Editor and choose the name of material we created before(Depthshader), choose instance (2)
back to the material editor, in the fall off parameters,change the falloff type to distance blend, setting the near and far distance, for example im using 29 for near and 111 for far distance (3)
look at this image
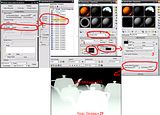
Next, render 2 image files(DOF_depth.tga and DOF_Color.tga). with *.tga extension cuz this extension could save depth information. Open the images in the photoshop, all selection(ctrl+A) in DOF_Depth image and copy(ctrl+c) (4)
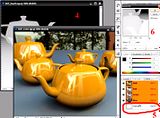
go to DOF_Color now and click in the channel tab and paste DOF_Depth into alpha channel(5)
and add a gaussian blur(6)
add lens blur, in the lens blur parameters change the depth map source to alpha, and the rest of it you just need to change the parameters until you satisfied with the DOF effect, oh yeah...you can also just click the parts of the image where you want to be focused(7)
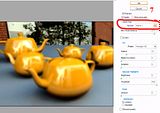
yep..that's it, with this you can save more render time and more efficient
im sorry if my english is sooo baadd :P and see you next time :)
okay, first create new material with black diffuse and name it Depthshader, turn on self illumination and give it fall-off material in the box beside the self illumitation color(1)
go to render setup in the processing tab, check enable in the material override, click the occlusion tab to open material browser, choose from Mtl Editor and choose the name of material we created before(Depthshader), choose instance (2)
back to the material editor, in the fall off parameters,change the falloff type to distance blend, setting the near and far distance, for example im using 29 for near and 111 for far distance (3)
look at this image

Next, render 2 image files(DOF_depth.tga and DOF_Color.tga). with *.tga extension cuz this extension could save depth information. Open the images in the photoshop, all selection(ctrl+A) in DOF_Depth image and copy(ctrl+c) (4)
go to DOF_Color now and click in the channel tab and paste DOF_Depth into alpha channel(5)
and add a gaussian blur(6)

add lens blur, in the lens blur parameters change the depth map source to alpha, and the rest of it you just need to change the parameters until you satisfied with the DOF effect, oh yeah...you can also just click the parts of the image where you want to be focused(7)

yep..that's it, with this you can save more render time and more efficient
im sorry if my english is sooo baadd :P and see you next time :)
nice tips and happy blogging!
ReplyDelete